Vicomi Feedback: Reaction Buttons for BlogSpot Blogs

Reaction/Reaction Buttons for Blogger - After a long time, I am back with another tutorial for you. Here is another big and very useful blogger widget. You can show reaction buttons on your BlogSpot blog. Reaction widget lets your blog readers leave feedbacks on the posts that you have published. We daily access our Facebook accounts, if you access your Facebook account from your PC you will see the reaction when you mouse-over the like icon. Similarly, blogger reaction widget uses the same process.
Check out: Auto Sharing Blog Posts On Social Media Networks
When blog readers leave the comments on your blogger posts, they need to spare few moments to type the comments but sometimes, readers just read the posts and then lifts without leaving the comments. There are many reasons behind this matter. It usually happens when your readers do not have time to type the comments. Therefore, reactions take just a second to leave feedbacks without typing. Here is very simple and easy way to add reaction buttons for BlogSpot blogger using vicomi.com website.
Read Also: OG Open Graph: Facebook, Twitter, Google+, Pinterest for Blogger
Adding Reaction Buttons to BlogSpot/Blogger
- Go to vicomi.com
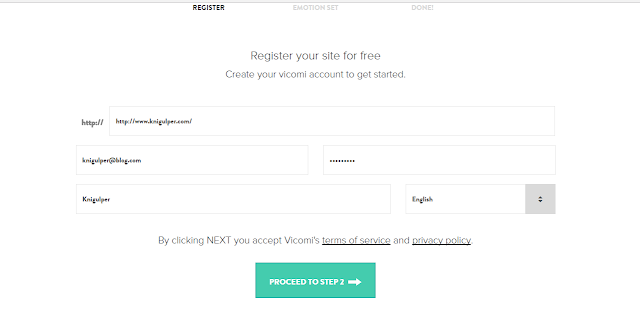
- Signup with your Blog title, e-mail address and your website/Blogger URL
- Click Proceed to Step 2.
- Choose your emotion design that matches the best with your blogger and click Done.
- Copy the code from vicomi.com as shown in the screenshot
- Now login to your Blogger Dashboard > Edit HTML and find </article> or <data:post.body/>
- Past copied code right after <data:post.body/> or </article> tag enclosed by <b:if cond='data:blog.pageType == "item"'> and </b:if> tags
- The final code will look like the:
- Finally, click Save theme and you are on the go.


<b:if cond='data:blog.pageType == "item"'> <div id="vc-feelback-main" data-access-token="381ccf9d6d4ec508d5d675cdecabd1ea" data-display-type="4"></div> <script> (function() { var v = document.createElement('script'); v.async = true; v.src = "http://assets-prod.vicomi.com/vicomi.js"; var s = document.getElementsByTagName('script')[0]; s.parentNode.insertBefore(v, s); })(); </script> </b:if>
Keep reading our posts. We will post more amazing widgets, tutorials, tips and tricks just for you. You can subscribe to our YouTube Channel to watch our latest tutorials or subscribe to RSS to receive our updates straight to your inbox.

0 Response to "Vicomi Feedback: Reaction Buttons for BlogSpot Blogs"
Posting Komentar